Thursday, June 27, 2013

Mavic's 640 Pedals

Picking a favorite Mavic component is a lot like picking which of your children is your favorite. It's unseemly, when we should be celebrating the unique beauty of all of them. But in the recesses of our minds, we all know there's one we favor just a tiny bit more. Sometimes it's rational, sometimes it's just because.

If you pushed me - and I mean really pushed me, it's possible I might admit a slight bias towards the 640 pedal, which is a little odd given that I never ride quill pedals. It's just one of those irrational loves for an unorthodox design. A design which probably isn't Mavic's at all.

The Mavic 640 is a traditionally shaped quill pedal, with a finish quality that has few rivals - with the innards to match. The more common version was intro'd in the early 80's, though a version was available in the 70's as well. Similar inside, but with a riveted (or maybe domed/hammered on, I don't know) cage.

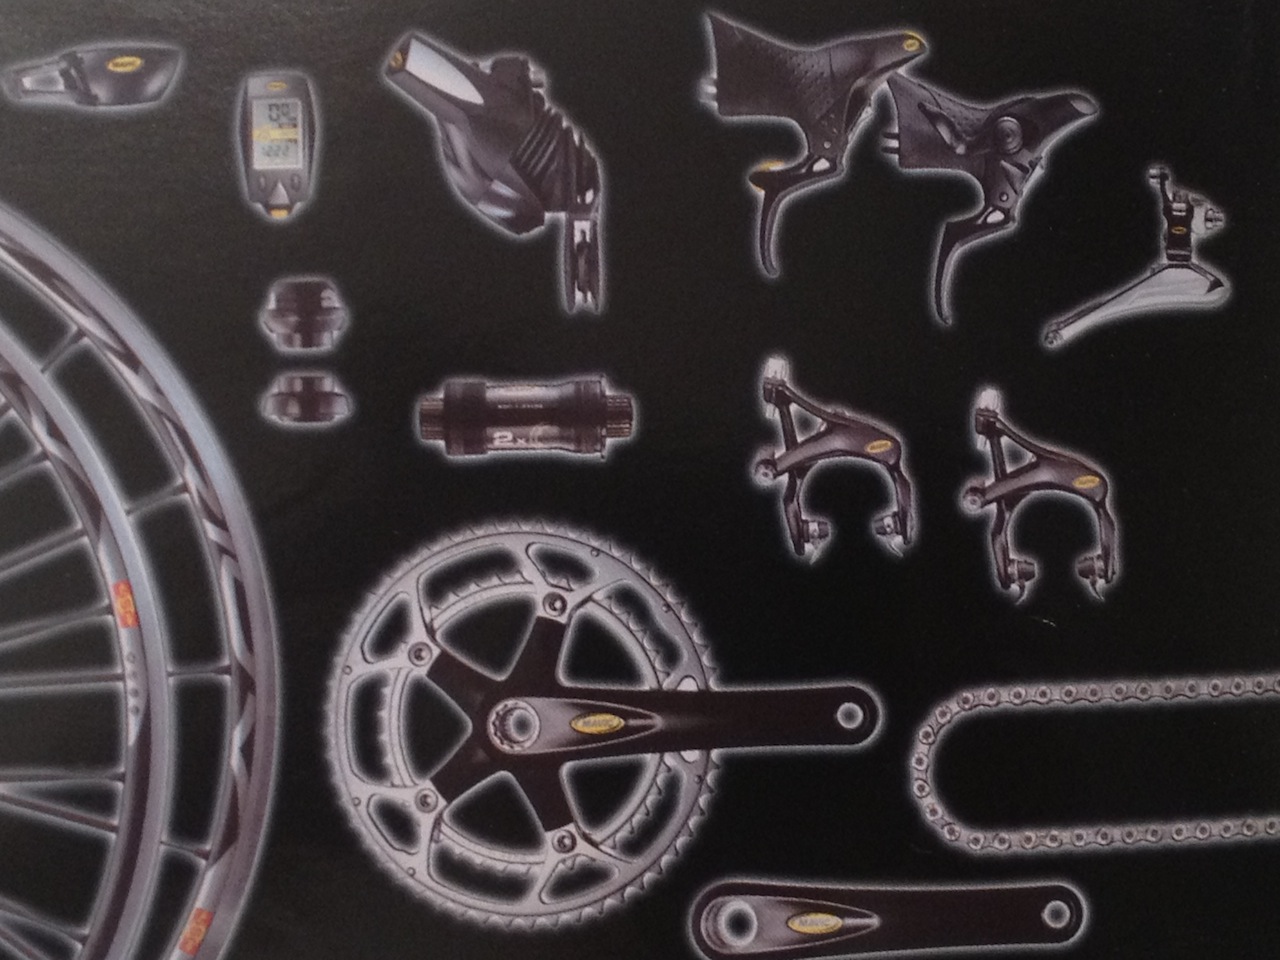
This generation of 640 has replaceable, hard anodized cages, secured with hex head screws. They varied somewhat over the years, with slight color variations in the anodization color, and slightly different logos. I believe the one labeled 'Made In France' on the same side as the Mavic name is the older one, with the other two cages in the picture above being later.

Inside things get get interesting. After removing the the aluminum dust cap, removing the spindle nut and spindle, the inner roller bearing and a traditional sealed bearing are exposed. Roller bearing on the inside bearing surface, traditional on the outer.

If you think the 640 bears an uncanny resemblance to the Specialites TA pedal, you're not alone. While I can't find definitive proof, I think it's a given that the 640 is at least based on the TA pedal. It's possible that Mavic licensed the design, worked from forgings provided by TA, or had TA do everything - the latter two possibilities all things they're known to have done with other components and manufacturers. By all rights, the TA version is nicer - grease port in the end cap, replaceable flip tabs, curvier cage. A very elegant quill pedal - if you're in to that sort of thing.

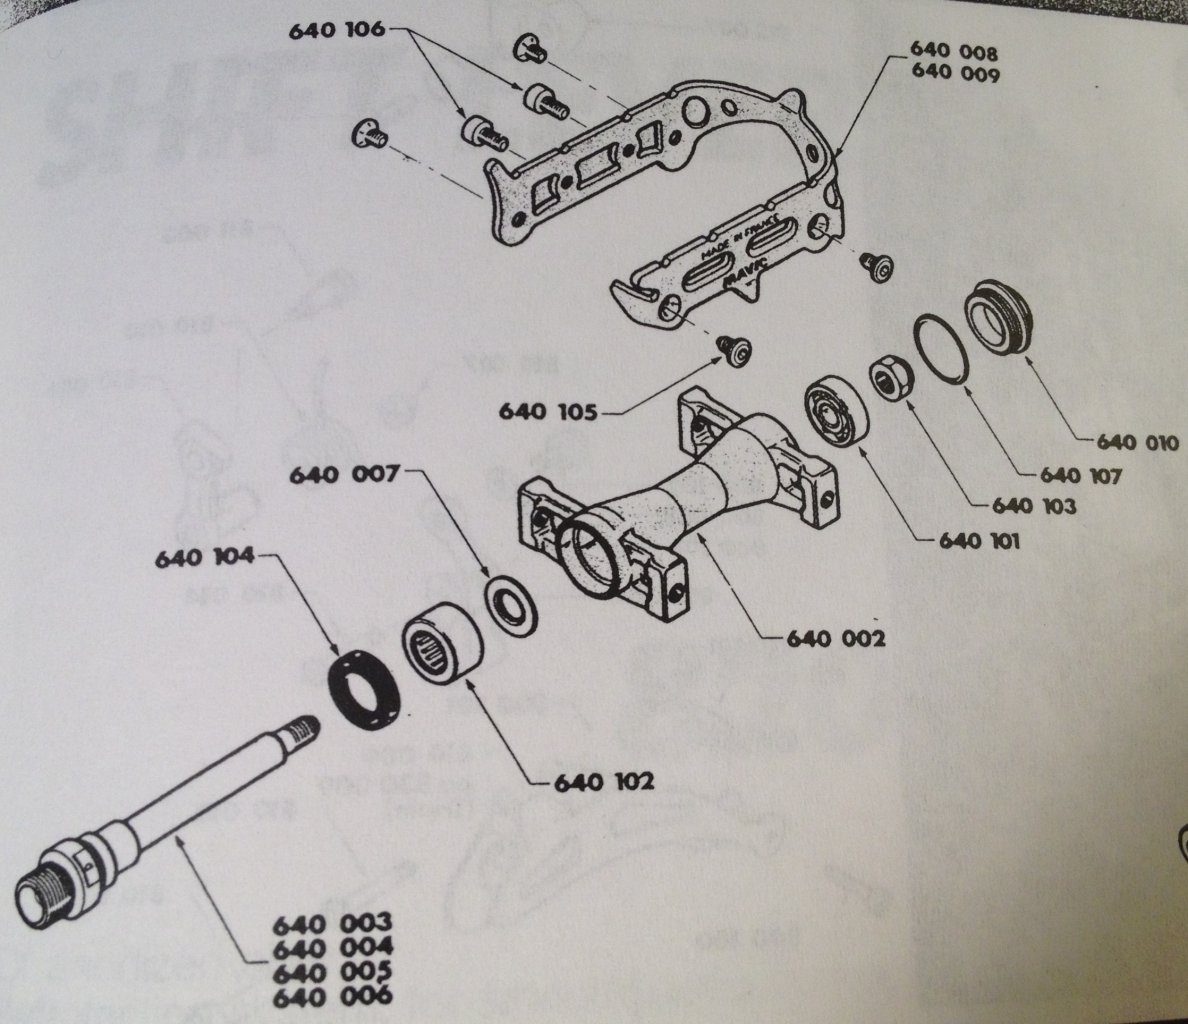
Parts explosion for those who find themselves with 640's in need of a rebuild.

Kids, if years from now you're reading this, know that it's totally you (whoever is reading this) that is my secret favorite. I never liked that other kid.

Tuesday, June 04, 2013

Mavic's other flight of fancy

Besides electronic shifting, that is. The scale of this, however, was a little grander...

Apparently, around 1984, Mavic opened their Air Department. Bruno Gormand, head of Mavic and the driving force behind their innovation since the mid-60s, was, it would seem, something of a modern renaissance man, pushing Mavic beyond the earth-bound limitations of bicycles. Those limitations would return following his death in 1985, and the dissolution of the Air Department.


The top image is of the 'Airplume' plane, an open cockpit 2 seater. The 2nd image is its spec sheet. The third shows photos and specs for the 'Avid Flyer' variant Mavic made, which is simply labeled 'Avion Experimental' in the photocopied sheet I have. I haven't included the cover as the quality is fairly low - but would be happy to if requested.

Friday, May 31, 2013

Patent Searching

Patent searches are tons of fun. Here are a couple of patents I found that I wanted to share:

Online patent searches provide a wealth of information about the workings of some of our favorite equipment - as well as the innovations, successful and otherwise, that preceded them. The slight variations and changes that happened from patent submission to real world implementation (note the spring setup on the Syncro patent, for instance) are really cool. Even cooler are the abortive attempts - take for instance this patent from Campagnolo, which was issued around the same time - it seems to be a slip-proof shift lever where the hinged part sort of acts as a brake on the spring (???), the need for which was probably negated by their "success" with Syncro. WTF indeed.

The pictures are truly worth the thousands of words that comprise the patents. If you come across anything cool, leave it in a comment below.

The picture-linked patents above are for the Mavic 571 face-pawl cassette hub, the Campagnolo Delta Brake, the Campagnolo Syncro 1 shifter and the original Shimano STI shifters

Monday, May 13, 2013

Photographs Lie - The Mavic gruppo that didn't quite exist

Mavic's last hurrah in the complete gruppo market came in the early 00's. Mektronik, introduced in 1999, seems to have cowed Mavic enough that I can't imagine we'll ever see them market a complete group again. Expensive, quirky, and downright troublesome, Mavic was looking just a little too far ahead when they pushed their even more futuristic replacement for the Zap to market. As Shimano and Campagnolo have demonstrated, today the world is ready for electronic shifting. 10 years ago, not so much.

But a gruppo isn't a gruppo without a full array of components. Mektronic provided the integrated brake levers and electronic rear derailleur. Lesser known, but also present was the Mektronic front derailleur - a mechanical derailleur, a pretty significant departure from their 810/860 design to work with the narrower 9 speed drivetrains that were popular at the time. Mavic also introduced their leaf-spring R3 brake at the same time. All were available, for a price, with the brakes still available up until the last couple of years.

But what about a crank and headset?

Mavic clearly had plans to offer Mektronic as a complete group. And to do that, they would need a crank/bottom bracket, and a headset. Their 2000 catalog showed just such items.

The headset, a threaded model, would be de rigueur, with 1" threadless headsets appearing on most high end frames right around that time.

The crank looks to be ISIS. It looks familiar, but I can't put my finger on what other vendor's crank it looks like. My guess? It's an FSA crank, or one of the closely related companies in Taiwan, who was probably also the source for the brake calipers and front derailleur.

Regardless of who was going to make the crank, it seems that it never happened - or if it did, it certainly never happened in quantity. I've never seen the crank (and associated bottom bracket) or headset, other than in the catalog. Everything else was produced, though certainly not in the quantity of earlier Mavic components. If you have a crank or headset, please send me pictures!

Huge thanks to John Liu for providing me the images from the 2000 Mektronic catalog!

Friday, April 05, 2013

Salvation on the Road to Roubaix

It's not atypical for a Paris-Roubaix narrative to wax on about how the roads from Compiegne to Roubaix are paved with the sweetest, smoothest pavement you've ever felt, interspersed with pavé nastier than you could even imagine. It's totally legitimate - the cobbled paths of Paris-Roubaix are entirely unlike those of the Ronde, where they are a part of daily life for those in the area. The cobbles in Paris-Roubaix, however, exist for few reasons but spectacle - their maintenance more a matter of archaeological recreation than planning. The abuse they mete out is real, and not merely mythology. Riding them is truly an experience in masochism. I rode the last 100km or so of Paris-Roubaix exactly a year ago today, and I found myself wondering why anyone would voluntarily do what I was doing.

So when you find yourself receiving your fourth or fifth (or first) cold stone massage between those amazing sections of smooth smooth tarmac, it's only natural to do what I did - to look around for salvation. Just like me, you'll think you've found it while looking off to either side along the cobbled sections.

The cobbled paths on which Paris-Roubaix are horse cart-cum-tractor paths, built to survive the frost heaves of winter and the never ending rains that precede and follow. Napoleon, the Romans - whoever built them, they built them to hasten getting from point A to point B while surviving the elements, with the technology they had available at the time. Jagged, horrible, uneven, rocky technology.

To survive, these cobbled roads needed to be permeable. Due to some combination of engineering and age, most of these paths are raised in the middle and slope to their edge, where a stretch of cobbles or some sort of runoff ditch running perpendicular to the main drag is found. This gutter acts as a sort of drainage flow for water coming off the main roadbed, allowing the paths to remain somewhat passable in adverse weather. Or, at least, that was probably the original intent.

Here, in the gutter, is where you'll think salvation lies. And on Sunday, you'll see scores of riders assume the same. Maybe it’s less jarring than the pavé itself, but its not without hazard.

Cruising along the side, you'll be beset by 3 primary risks.

As a conduit for runoff, the gutter is also where all of the debris and filler material from the cobbles end up. At times, the amount of dirt and sand there creates a serious risk to traction and control - turn your bar too quickly or slide the rear of your bike tearing around a cobbled corner and expect to fall. Do so with a strung out peloton, and expect to be run over as well.

When cobbles line the gutter they are, for the most part, in better shape that the main pathways. As you're riding over the cobble the "long" way, the edges are less frequent and narrower; rather than being 6-7" wide, they're a mere 2-3", and tend to not protrude as much. Except when they do, or when an entire section of gutter has been washed away due to erosion. At this point you'll be headed for a hole. If you're quick enough, you can dash towards the main cobbles, hoping your wheel doesn't get pinched in the transition. If you’re not so quick, you’re going down.

The biggest risk in the gutter may not be the gutter itself, but the eroded shelf of scrubby vegetation that lies adjacent to it. After decades (centuries?) of use, the cobbled roads appear almost sunk in to the countryside. In some cases, this isn't far from the truth - they've been dug from under the fields in which they were buried in order to enrich the spectacle of the day. In other cases, constant use of the roads and tilling of the adjacent land has built up a cliff of dirt, grass and weeds along the roads. In some places its a couple of inches high. In others, it can be taller - tall enough to make pedal strike not just possible but probable. And in spite of your slow speed, when you strike a pedal on the ground you will be thrown from your bike. Given a choice, aim for the dirt, mud and, stinging nettles that lie on the non-cobbled side of the road. The nettles will sting for hours, but consider yourself lucky - your collarbone is in one piece.

So this Sunday, when you're watching riders taking the “easy way” through the cobbles by riding in the gutter, don’t judge them. For while the gutter may offer temporary relief to the rattle of the cobbles, it dishes out plenty of its own punishment. Dirty, itchy, muddy, beautiful punishment.

Sunday, February 17, 2013

Syncro 2 Insert Tool

Ever notice how bike maintenance goes much, much smoother when you have the correct tools? And how horribly awry things can go when you don't? I'm not proud to admit I've marred the edges of a headset top nut by trying to use an adjustable wrench instead of taking literally 2 steps to the right to grab a proper headset wrench. Or rounded off the small bolt that attaches the cable to the front derailleur. We've all done these sorts of things, felt a little sheepish about being lazy, and learned our lesson. Mostly.

One question I've gotten on occasion, given my somewhat suspect reputation as a Campagnolo Syncro shifter expert, is how to install shift inserts in to the levers. I've always just used a pick or small hex wrench to push back the G spring on one side, and tried to push the insert in. Giant pain to do, and an excellent way to stab yourself with a pick. Given how infrequently one would ever actually change an insert, I didn't spend too much time figuring out a good way to do it.

As you'd expect, there's actually a proper tool to install the shift inserts - with the somewhat non-descriptive name of Syncro 2 Quick Mount. I made a little video to show how the tool works.

It's definitely one of those tools no one should really need - who works on that many Syncro levers, especially in 2013? But for the workshop that needs to have the correct tool for every weird, esoteric bike bit...here's another one to watch eBay for!

Tuesday, January 15, 2013

Close quarters work stand

Or perhaps, the correct term is work hang.

Regardless, a recent move gave me the opportunity to move my previously off-site workshop on-site. The change has been immense - where before the round-trip travel time to my old space dictated spending ever diminishing stretches of time in the 'shop, I can now pop and in out while doing other things. An undeniable improvement in the amount of time I get to work on projects, while spending more time with my family.

What my new workshop lacks, however, is width. At 15'x8', it's pretty narrow in there, especially with all I've jammed in there; decades of magazines, books, bikes, tools, parts, rolls of carbon fiber.

A traditional work stand has a pretty wide base. The best are heavily weighted shop stands, not meant to be moved around. A non-option for me, since I need something that doesn't take up space when not in use. Folding stands tend to require a pretty wide footprint when in use, and aren't exactly un-intrusive when folded. Bolting something to the ceiling that can fold up and away seemed like an obvious choice, especially when I can bolt other things up there to facilitate other work - overhead dust collection, routing the hoses for my vacuum pump or targetted task lighting via a jointed arm being the first use cases I've come up with so far.

It's all constructed out of 80/20 parts, bolted to a 2x4 that is in turn secured to the ceiling beams via lag bolts. The bike attachment is just a cheap bench mounted clamp I cut down slightly - it's actually pretty terrible, and at some point I'll find a better clamp. All in all, though, I'm very happy with it, and excited to start working on the projects it will facilitate.

Related Posts with Thumbnails